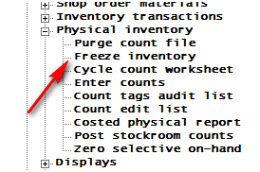
This chapter contains the following topics:
Introduction to Physical Inventory
Traditional Physical Inventory Method
In this function you may enter, edit, post and cost physical counts of On Hand inventory quantities. Unlike the "Inventory transactions" function, these programs do not post transactions on-line as they are entered. Before posting counts to the Item records, you may run edit lists to verify count transaction entries and to account for all physical inventory Tag Numbers issued. The Physical Count Edit List also highlights counted items which are missing cost information in Item Masters.
After you review the Physical Count Edit List and Physical Count Tag Audit List to verify transactions, the stockroom counts may be posted to Item inventory records before you proceed with inventory costing functions. This allows timely posting of updated On Hand balances and resumption of inventory transaction processing after the physical counting and entry activities are completed.
Since posting Physical Counts does not automatically remove those transactions from the system, you have more time to research missing costs, update those costs on the Item Master File, and run a final Costed Physical Inventory Report. This report uses the "frozen" Physical Count Transaction File as the source of On Hand quantities and the Item Master File as the source of unit costs.
The entry, posting and reporting functions may be done on a location by location basis if you have multiple warehouses (or plants). After you post all stockroom counts and print satisfactory Costed Physical Inventory reports for all locations, you may use the Purge Count File program to remove Physical Count Transactions.
In addition to Stockroom counts, you may also enter and cost Work-In-Process counts of component materials and of finished manufactured parts, subassemblies or assemblies on the shop floor. Physical Count Transactions coded as WIP are not posted to Item records by the post program. WIP counts are reported as separate categories on the Count Edit List and the Costed Physical Report.
After you have posted counts for a "100 % Physical Inventory", you may use the Zero Selective On Hand Balances program to zero stockroom On Hand balances for items that were not counted and posted during the current Physical Inventory processing. This approach avoids the need to zero all inventory balances before counts are posted and allows use of other Inventory Management programs while the physical inventory is being processed.
Use the Cycle Count Worksheet program to select and list items to be cycle counted, if you use that method of verifying record balances.
At some point, most companies must take a physical inventory. This entails several steps including counting materials, entering counts into the system, reconciling the count variances, and finally posting the new counts to inventory.
Using the traditional physical inventory method it is important to note that you can not process transactions in PBS Manufacturing after the counts have been taken until you post the physical inventory. Any transactions performed at this time will be lost when the posting occurs. This includes posting invoices in C/O. Remember, when you post invoices in C/O, you are relieving inventory of the items being shipped. You may, however, select items for billing and can even print the invoices. All items selected and printed will be posted at the first posting after your physical inventory is complete.
If you prefer to continue doing business during the physical inventory see the Freezing inventory method in the next section.
It's important each step is done carefully:
| • | Before you begin it's recommended you catch up any outstanding inventory transactions in the system. Doing so will make the reconciliation process much easier and can help you achieve more meaningful results. |
| • | Next, you must count your inventory. This information may be collected however you wish. Some use multi-part tags, others use pads and mark counted items with stickers, some even use bar code devices programmed to output data in a certain format and import this into PBS Manufacturing. You can also print a list of all inventory items using the Cycle Count Worksheet. |
| • | Once the data is collected it must be entered into PBS Manufacturing using the I/M, Physical Inventory, Enter Counts program. If using a third party program, you must import your data instead of manually keying it in. |
| • | You may now begin running the various reports you wish to use for reconciling your counts. You may wish to print the Count Tags Audit List, a report which can help you find missing tags if preprinted tags are used. You may also choose to run the Count Edit List, and should run the Costed Physical Report. |
| • | We generally recommend reconciling your highest variances found on the costed physical report. Very often items are counted incorrectly, there may be outstanding issues, or a variety of other minor issues which can be corrected prior to posting your counts. Reconciling larger variances will help you avoid double adjusting to correct these mistakes (i.e. adjusting at the posting of the physical and again when the error is caught at a later time). If you find bad counts, go back into the program where you entered the original counts, find the count record that's wrong, and change it to the correct quantity. |
| • | Once you've reconciled your counts and printed your final Costed Physical Report, you are ready to post your physical inventory using Post Stockroom Counts. This will update your on-hand inventory based on your counts. After the posting is complete you should run the Zero Selective On-Hand program. This program will zero all items not counted in this inventory as it assumes if it wasn't counted, you don't have it. |
| • | This completes the process of taking a physical inventory in PBS Manufacturing. |
Cycle counting is the process of taking a physical inventory on a small, randomly selected batch of items. You may run the cycle counting report from the Physical Inventory menu. The same basic steps you used for taking the physical inventory will be used for cycle counting.
Cycle count frequency may be set in the Item Master record. This is used to help determine which items should be printed on the cycle count worksheet each day. If you didn't set this up when you initially established your Item Master records, you can use the automated utilities for establishing this information. These are found in the I/M module under Update Item Controls. If you have established ABC classification codes in your items, you can simply run the Cycle Count Frequency program. This will allow you to set count frequency based on the item's classification. If not, you can run the ABC Class program and set your ABC classifications automatically as well.
It's important to note that cycle counting is a wonderful tool for gaining better control over your inventory accuracy. It enables you to micro manage inventory and, unlike a physical inventory, all variances may be reconciled. Take the time to do this. Track down the root of an error. Before long you will begin seeing a pattern of problems. You can then start to deal with the problem(s). Sometimes you will find a problem employee who must be re-trained or dealt with in another manner. You may also find inefficient material reporting processes that may be changed. In any event, you not only increase the short-term accuracy of your inventory but you may also be able to increase plant efficiency. Some companies have even been able to eliminate the need for taking a physical inventory by using cycle counting methods.
With this program you may freeze your physical inventory at the time you are ready to start your counts. You do this by taking a snapshot of your inventory at the time you are ready to start your physical inventory, thereby allowing you to begin transacting once you are done with your counts. This powerful capability will allow you to essentially pick up with business as usual once you have completed doing your counts.
First, let’s define Physical Inventory. This is when you count ALL items you have, compare the counts to your existing records, verify any discrepancies are indeed discrepancies, and then you update your records with the new counts thereby adjusting your present inventory values up or down.
Traditionally in PBS Manufacturing, you had to shut down all transactions from the time you start counting until the time you have completed the reconciliation process and posted the counts. This new option allows you to start transacting far sooner in the process.
In the I/M module, under the Physical Inventory menu selection, you will find access to the Freeze inventory program:
This program adds a critical, though simple, step to the physical inventory process. Typically, the steps to perform inventory using this function are as follows (each will be covered in more detail later in this document):
| 1. | Make sure you have stopped physically moving materials, and complete any outstanding transactions in the system. |
| 2. | Purge count file – This will clear out the records from your prior physical inventory. |
| 3. | Freeze inventory – This is the new step that will allow you to take a snapshot of the inventory as it sits the day you start counting. NOTE: Step 1 must be completed before you perform this step! |
| 4. | Cycle count worksheet – If you wish to print the worksheet to take your counts you may do so using this program now. It’s not required and many companies don’t use this report to take counts. |
| 5. | Count your inventory. |
| 6. | Enter counts – This is where you will enter your counts either as they are being done or once the actual counting is complete. The timing is up to you but this MUST be completed before you continue. |
| 7. | Run one or more of the following reports: |
| 8. | Reconcile your counts! This is a very important step in the process. Take the report of your choice and select the larger variances and make certain the counts are correct before you continue. If you find a count was either entered incorrectly, or the count was recorded incorrectly, return to step 6 and modify the count(s) as needed. Re-run your report to make sure everything is in line. |
| 9. | Post stockroom counts – When and ONLY when you are satisfied that the counts are as correct as they are going to be, post your counts. |
| 10. | Zero selective on-hand – This is the last step in the physical count process, where any items not counted in this physical inventory are automatically adjusted to zero. This means you only have to enter counts for items you have and there’s no need to enter 0 counts. |
Now that you have discontinued material movement, and completed any inventory transactions that needed to occur in PBS, it’s time to prepare your system for counting. This will begin with purging your count files.
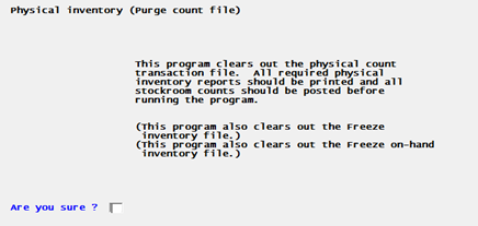
This program is quite simple, it explains what it’s about to do and confirms you wish to continue with the process. As the program indicates, the process will remove all prior inventory counts that may still be on file in preparation for entering your new counts. Notice it also now clears out two other key files we introduce in the new Inventory Freeze option; Freeze Inventory and Freeze On-hand Detail files will also be cleared out.
|
Note |
It’s important this program only be run when you are ready to clear out both your counts AND your frozen records. If you have already frozen your inventory, and have begun transacting against that inventory, DO NOT run this program again during this physical inventory. |
Simply answer Y and press enter and these files will be cleared out and are now ready to accept data for your physical inventory. The program will notify you when it’s completed.
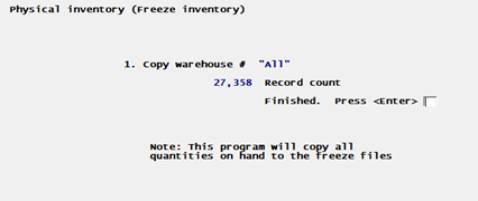
The next step is to freeze your inventory. There are very few options involved and it’s quite a simple process:
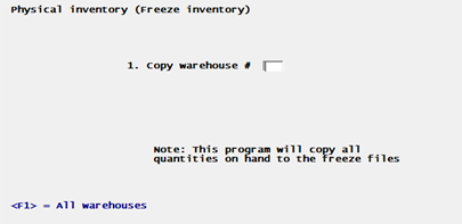
If you only use a single warehouse, you can specify that warehouse here. If you use multiple and plan to count some or all of them, use the <F1> option.
This process creates records in the two new files, the Inventory Freeze and the On-hand Detail Freeze files. The first is a snapshot of your inventory as it exists in the item master file as well as in your branch warehouse records. The item, and it’s current quantity on-hand are stored for comparison later when we are ready to post. It’s this file that allows you to continue performing MOST (more later) transactions.
Similarly, the On-hand Detail Freeze file contains a snapshot of all of the details behind your inventory at the time of the freeze. More specifically, this will have data for items that use lot or serial number control, and if you use multiple location storage, the data that tells you where your inventory is being stored.
Together, these files will allow you to begin performing most transactions once you’ve finished counting your inventory.
Not all companies will use this step though it can certainly be helpful for those that wish to do so. The cycle count worksheet is a document intended for use specifically for cycle counting. This is where you would count a limited number of items on a daily basis, verify and post their counts, as opposed to counting all of your inventory. It’s specifically designed to only pull a limited number of items.
Historically, many companies have purchased pre-printed count tags from their printer. These are generally multi-part forms and have a single tag for all items in your item database. In the event you aren’t doing this, and would like a convenient list of items with a space for your count information, you may opt to use the cycle count worksheet.
We have placed in a special by-pass option in here that will allow you to print a list of all of your items regardless of cycle count status. When you first enter the program you will be provided this option:
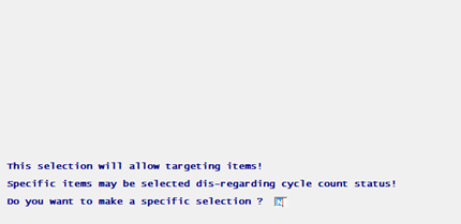
Simply answer Y and press Enter if you wish to print the list for all items. You will then be presented with the following options and we recommend using them as follows assuming we’re counting everything:
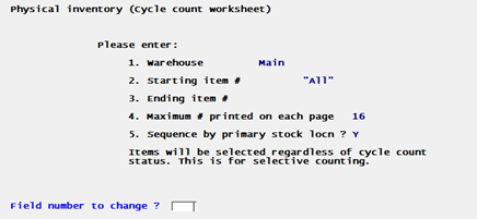
Repeat this for each warehouse you plan to count.
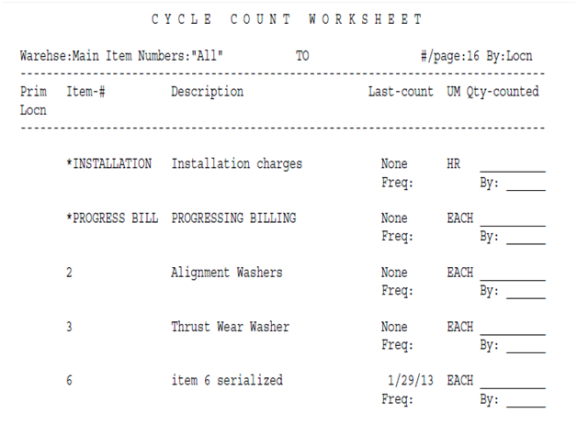
The report will look something like the one below. The counter can note total quantity and to the right, any location or lot/serial number data as appropriate:
Let the counting begin!
It’s our recommendation that no transactions occur until your counting is completed. At that time, the users can be allowed to begin transacting again.
|
Note |
DO NOT perform ADJUSTMENT transactions during the freeze period. You will be correcting something that’s about to be corrected and will create inaccurate inventory numbers once the physical inventory is completed and posted. In addition, for users who use the multi location storage feature, we recommend not relocating items in the system during this time. This can cause issues within the on-hand detail records that may need to be corrected after the fact. There is an exceptions report to help identify issues like this which will be covered later in this document. |
This can occur as the counting continues or can be done once the counting is complete. To minimize the amount of time it takes to complete their physical inventory, many companies begin entering counts as they are being done.
The count entry differs from site to site depending on the options you use:
Everyone will enter warehouse, whether this is a stockroom or Work In Process count, item, tag number, quantity counted, initials and count date. If you use multiple location storage you will be prompted for the location code (field #7 above). If an item is lot or serial controlled, you will be prompted for lot or serial number as appropriate. There will be at least one count record for each lot or serial number counted.
Tip: If you have multiple users entering counts, and don’t have tag numbers, start each user with a different tag number and it will increment automatically for you by pressing Enter. For instance, user one will start at 1 and user two may start at 5000. This provides user 1 4999 potential tag numbers to enter.
Tip: Use the Breakout tools to set defaults for fields that are going to be the same every time. For instance, if counter initials isn’t important for you, or will remain consistent for a large run of counts, set Breakout to default this for you. Do the same with fields like count date, and even Stockroom/WIP. This can save your data entry folks hundreds if not thousands of keystrokes during the entry period making them more efficient.
Tip: We recommend you only enter items with counts. In other words, don’t enter a 0 count. This will often reduce the number of entries dramatically and can speed up the process. 0 counts will be handled by this process.
Now that your counts are entered, it’s time to run some reports. There are three different reports you may opt to run. Remember, you can run these to PDF and only print off pages you need to physically hand to someone for verification:
| 1. | Count tags audit list – this report is great for companies using pre-printed tags that were pre-assigned a tag number. If you want to ensure all tags are accounted for, you can run this report and it will highlight missing tag numbers. If you are only entering items with actual counts, as recommended above, this report is probably not necessary. This report does not use nor need the freeze files. |
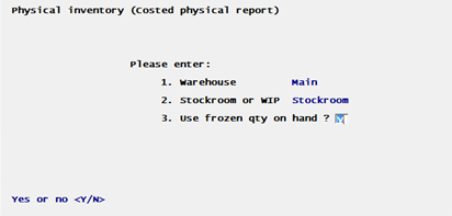
| 2. | Count tag edit list – This report will give you a reconciliation report for only those items you have counted (excellent for cycle counting) and it provides details like location, lot or serial numbers counted. It can be used to reconcile those counts. It highlights each count, location, lot or serial number where appropriate, and will show you your variances. This report DOES provide the option if comparing your counts to the frozen records or not (first image below). If you have frozen your inventory, and more importantly, have begun transacting inventory again, it’s important you answer yes here. Your counts will be compared with the frozen records as opposed to your actual moving inventory values in the item master and on-hand detail files. |
| 3. | Costed physical report – This report will also provide you with an excellent reconciliation report. One of the primary differences between the edit list and this report is this one will provide you with a look at all items, whether you counted them or not. The other is it doesn’t show the level of detail the count tag edit list does. It provides total counts, not location, lot or serial number data. This is the better report when taking a complete physical inventory as it will also highlight items you haven’t counted where there is inventory showing in stock. These items will be adjusted in the final step of this process so it’s important to reconcile both counted items as well as items not found. This also uses the option to view the frozen quantities (second image below) and it’s important to do so if you have frozen your inventory and have begun performing inventory transactions. |
Now that you’ve counted your inventory and entered those counts, it’s time to reconcile your counts! What we mean by this is you can review your report(s) of choice above and seek out higher dollar or quantity variances and make sure these are indeed variances before posting your physical inventory.
This is the process that makes the freeze option necessary as it can take up to several days in some cases to get done. Things you should be looking for on larger variances:
| 1. | Compare the total count quantity to the tags/report the counts came from. Verify this isn’t simply a data entry error. |
| 2. | Assuming the data was entered correctly, go and re-count that particular item and verify the counter didn’t write down the quantity incorrectly or perhaps overlooked inventory. |
| 3. | If the counter appears to be correct, you may want to review the open allocations and make sure this isn’t a missed transaction which could be easily corrected (adjust the count accordingly and then perform the appropriate issue). |
If a count is incorrect, return to the Enter Counts function, bring up the record and correct it.
Once you are done reconciling, we do recommend you print the Costed Physical Inventory report and store it as a PDF file on your server as a record you can return back to in the future. You may also wish to do the same with your Count Edit List. If your accountants want to understand why an adjustment was made, these will be helpful in seeing the reasons.
The hard part is done! Once you’ve reconciled your inventory and printed off your final reports it’s time to post your counts.
The posting process will perform a series of Adjustment transactions to your inventory based on the counts you took. If you froze your inventory, it’s important to indicate you want to base these counts on the frozen values. Also beginning in v12.03, you have the option to post your inventory using “today’s date” or the count date entered in the records. The reason you may choose to do the latter is this will allow you to post the transactions in the prior period where you may wish to have the adjustment land in the accounting.
Depending on a number of factors, including number of items, network speed, options used in the inventory system, this may take a few moments or may take some time to post. Let this process run to completion. We do recommend posting when nobody else is in the manufacturing system. It’s not required but can speed up the process.
When using the freeze option, and lot/serial control and/or multi location storage, there may be times where the details of the transaction can’t be completely determined by the program. For instance, if inventory is relocated and subsequently issued, we may not have a perfect match for the record any longer. A miscount on a lot or serialized item that is later issued from stock could lead to a problem like this. To handle these exceptions, we will create an on-hand detail record with an undefined location and lot or serial number as appropriate. These exceptions will appear on the exceptions report you will be asked to print (PDF is a valid option).
The report will show an individual record for each instance. Each record will include the item, description, “Counted”, “Difference” and “Recorded”.
| • | Counted – actually represents the count of the on-hand detail transaction as it exists at the time of the post. If this is 0, that means no matching record exists (likely issued from stock) and an undefined record will be created to provide balanced details for your item’s actual on-hand quantity. |
| • | Difference – This is the “variation” we are dealing with from the actual quantity on-hand, to the on-hand detail. |
| • | Recorded – This is the quantity that’s recorded in the new on-hand detail record we’ve created if no matching transaction existed or the on-hand detail record we updated if one was found. |
If you check the item you see, and view the on-hand detail report or display for it, you will find the new undefined record. If it’s a location issue, simply verify the location it should appear in and use the IM, Inventory Transactions, Relocate tool to relocate this quantity. If there’s a lot/serial number situation, you need to verify the quantity on the shelf and adjust accordingly.
Most instances we’ve seen with lot or serial numbers has been a situation where there was a miscount in the physical inventory and the lot or serial number have since been issued from stock. Simply perform an adjustment to correct this circumstance. If you follow the above transactional recommendations, the number of records on this report should be minimal and take only a little time to correct.
This last step is only done when taking a complete physical inventory! In this case, adjustments have been made to all items we entered counts for, where they varied from the original count. Even if an adjustment wasn’t made, we’ve updated the item master’s date of last count for each and every one of those same items. We now need to adjust out any items that the computer showed in stock but we didn’t find/count.
Simply use the program as shown below (accounting for warehouse and appropriate date of course), to tell the program to zero out those items not counted. The correct value for field #5, the date, will be the day prior to your count date. In other words, anything not counted after that date will be zeroed out using adjustment transactions. The freeze files will be used to compare items that may be new to the system, or received after the physical was taken, allowing you to still adjust items accordingly.
Again, it’s best to run this program when no other users are in the manufacturing modules though not required. You will be provided the option to run a report. This report will show you all of the adjustments the program is about to make. You may want to review this list quickly before completing the process. Again, it’s always a good idea to display this to screen as a PDF file and save it with the rest of your physical inventory reports to refer back to in the future. You will be provided with an opportunity ti back out once you’ve run the report (or existed out of the PDF report):
Once you indicate Y and press enter, the program will complete it’s processing and complete the physical inventory process!
Select
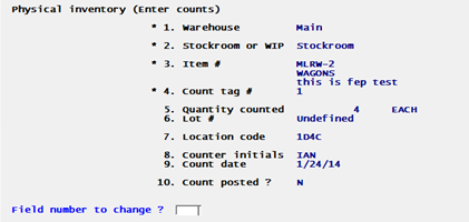
Enter counts from the Physical inventory menu.
The following screen displays:
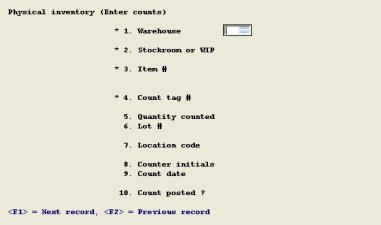
Enter the following fields:
1. Warehouse
Entry Format: Up to 2 alphanumeric characters, or space for "Main".
Default: Previous transaction value, if not first entry.
Validation: If entry is not "Main", it must match a record on the Warehouses File.
2. Stockroom or WIP
Entry Format: S= Stockroom or W= Work-In-Process.
Default: Previous transaction value, if not first entry.
Comments: S (Stockroom) counts will later be posted to Item inventory records;
W (WIP) counts will not be posted as On Hand inventory, but may be costed on the "Costed physical report". "Stockroom" inventory may include "floor stock" that has not yet been issued to WIP.
3. Item #
Entry Format: Up to 15 alphanumeric characters.
Validation: Must match an Item Master record.
Comments: Enter spaces to select by description to search for an Item Number by entering any portion of the first 30 characters of its description.
4. Count tag #
Entry Format: Up to 6 numeric digits.
Default: Previous transaction value plus one, if not first entry.
Validation: Cannot duplicate another Tag Number on the current Physical Count Transaction File.
Comments: If you don't use pre-numbered Tags for recording physical counts, you may enter any starting value for the first tag number, and accept the default for subsequent tag numbers. However, you must always enter a unique number that does not duplicate a Tag Number already in the Physical Count Transaction File.
5. Quantity counted
Entry Format: Up to 8 numeric digits plus 3 decimals, without a minus sign, or zero.
Comments: The item's Inventory Unit of Measure displays to the right of this entry. Make sure that the quantity entered is in this UM.
A zero quantity entry may be necessary to clear an invalid non-zero quantity from an Item inventory record, or simply to update the Date of Last Count in the Item Master if a Cycle Count verifies a zero record balance.
6. Lot # (or Serial #)
Entry Format: Up to 15 alphanumeric characters, or Blank for "Undefined".
Comments: This field is only entered for Stockroom counts if the item's Control Method is Lot or Serial #; otherwise, the entry is bypassed and "Undefined" is displayed.
When you enter Lot or Serial Number for a Purchased item, you are also prompted to enter:
Vend # Vendor Number, up to 6 alphanumeric characters or Blank for "Undefined".
Reference Up to 25 alphanumeric characters, or Blank for "None". You may want Vendor Name in this field.
7. Location code
Entry Format: Up to 5 alphanumeric characters, or Blank for "Undefined".
Comments: This field is only entered for Stockroom counts if I/M Control Information indicates that Multiple Stock Locations are used; otherwise, the entry is bypassed and "Undefined" is displayed.
8. Counter initials
Entry Format: Up to 3 alphanumeric characters.
Default: Previous transaction value, if not first entry.
9. Count date
Entry Format: 6 numeric digits in MMDDYY format.
Default: System Date if first transaction. Previous transaction value, if not first entry.
After a stockroom count transaction is posted by the Post Stockroom Physical Counts program, you are not allowed to change or delete the record unless you change the Count Posted field back to N, or until you delete the entire transaction file by using Purge Physical Count File. You may change Count Posted as follows:
10. Count posted ?
Entry Format: Y or N.
Validation: Entry must be Y or N. Program does not allow change from original record value of N to Y, but record value of Y may be changed back to N. An accidental change to N may be reversed back to Y, if done before the record is rewritten.
Use this selection to “freeze” the inventory when it’s time to take a physical inventory. This will allow you more time for reconciling the inventory while not holding up daily transactions.
The Freeze file is a snapshot of the current inventory totals. This program writes records to the Freeze file. It copies in the Warehouse, Item and Quantity on-hand data to this file for each item and/or branch record.
When running Post stockroom counts you have the option of using the frozen quantity on hand.
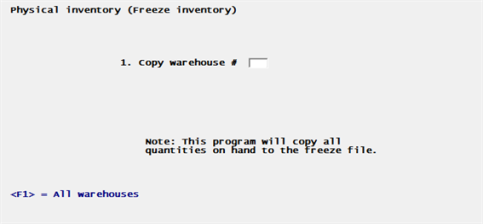
Enter the following field:
1. Copy warehouse #
Select <F1> for all warehouses or enter a specific warehouse.
The reconciliation reports and posting use the quantity on-hand in the freeze file. This includes:
Count Edit List
Costed Physical Report
Post Stockroom Counts
The posting program uses the variance quantity (count qty netted against frozen qty = adjustment qty).
A separate list, with totals, is printed for each Warehouse and Stockroom or WIP category. Count transactions on each list are sequenced by Item Number and Tag Number, and the total count by Item Number is also printed. For Stockroom counts, the variance of each Item's total count from its inventory record quantity and the costed value of the count variance are also listed. A "Posted" code (Y or N) printed for each Stockroom count transaction indicates whether that transaction has been posted to the Item inventory record.
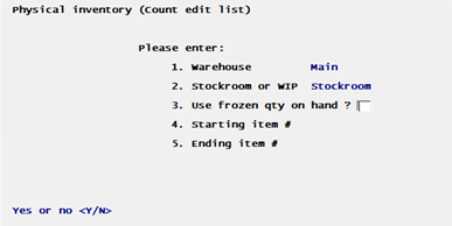
Select
Count edit list from the Physical inventory menu.
The following screen displays:
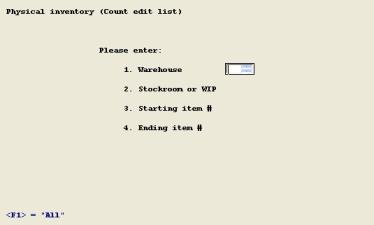
Enter the following fields:
1. Warehouse
Entry Format: Up to 2 alphanumeric characters, or <F1> for "All"
2. Stockroom or WIP
Entry Format: S or W, or <F1> for "All"
3. Starting item #
Entry Format: Up to 15 alphanumeric characters, or <F1> for "All"
4. Ending item #
Entry Format: Up to 15 alphanumeric characters, or spaces for Starting.
Totals printed for each Warehouse Stockroom or WIP category are:
| • | Total counts listed Number of count transactions. |
| • | Total items listed Number of items on list. |
| • | Total items - no cost Number of items where cost not found on Item Master file record at the time of printing. |
| • | Total items - no item master Number of items where Item Master record not on file at the time of printing. This indicates Item Masters were deleted subsequent to entry of the count transactions. |
| • | Total variance amount Printed only on Stockroom Category lists, as the total dollar value of all costed quantity variances. |
The program will list all records from Physical Count Transactions that are within the designated Tag Number range, in Tag Number sequence. This report also identifies missing Tags within that block of numbers by a "Break in tag sequence" message, including any missing numbers at the beginning or end of a specific Tag Number range.
Select
Count tags audit list from the Physical inventory menu.
The following screen displays:
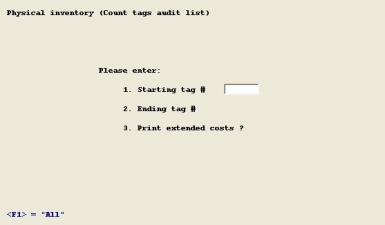
Enter the following fields:
1. Starting tag #
Entry Format: Up to 6 numeric characters, or <F1> for "All" tags starting with lowest Tag Number in the Physical Count Transaction File.
Comments: If you are auditing a specific block of tags that was issued for inventory, you should type in a number for both Starting and Ending entries to allow the program to identify missing tags numbers at the beginning or end of the block.
2. Ending tag #
Entry Format: Up to 6 numeric characters, or spaces for Starting
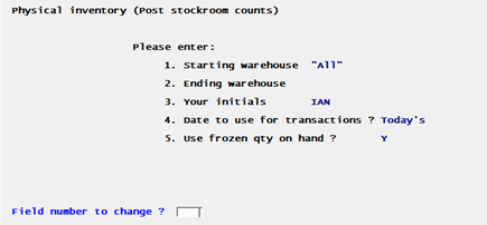
You may post Stockroom counts to Item inventory records, as soon as you are satisfied with the accuracy of the count transaction quantities that appear on the edit list. Since posting does not remove Count Transactions, you may do this before all Item cost data discrepancies are resolved to obtain accurately costed counts.
This program allows you to select the Warehouses for which you wish to post Stockroom (S) counts to the On Hand balances in Item inventory records. Transactions containing a WIP (W) category code will not be posted.
On Hand balances in the Item Master or Branch Warehouse Item records are adjusted by the Stockroom count quantity variance for the Item Number in that Warehouse. Date of Last Count in related Item records is always updated by this process, even if a zero adjustment resulted from posting the Item count. Adjustment transactions created by this program are automatically written to Inventory Transaction History. If you use Multiple Stock Locations for all items or you use the Lot or Serial Number Control Method for some items, On Hand Detail records are updated by the Stockroom physical count records for those items.
Count transactions posted by this program are coded as Posted so they cannot easily be changed or re-posted by this application. All Count Transactions must be purged before you can use this function to subsequently adjust the On Hand balance of a posted Item and you do not want to purge this data until you have completed all Physical Inventory costing functions. However, during the period where posted Physical Count Transactions are still on file, you may alternatively use the "Inventory transactions" function to enter and post more Adjustment transactions for any Item Number.
Select
Post stockroom counts from the Physical inventory menu.
The following screen displays:
Enter the following fields:
1. Starting warehouse
Entry Format: Up to 2 alphanumeric characters, space for "Main", or <F1> for "All" warehouses.
2. Ending warehouse
Entry Format: Up to 2 alphanumeric characters, or space to default to Starting
3. Your initials
Entry Format: Up to 3 alphanumeric characters. This is a required field. It is not validated against an actual login user ID.
4. Date to use for transactions ?
Your entry here determines the physical count date that is written to the files. Enter C for the count date or T for today's date. The default is today's date.
5. Use frozen quantity on hand ?
Enter Y or N. See the Freeze Inventory section.
After you have verified count quantities and the unit cost data for items appearing on the Physical Count Edit List, you may wish to run this report.
This report costs the item On Hand count totals within the Warehouse and Stockroom or WIP category, and the Stockroom count variances from the computer item records. Warehouse Category Totals, Warehouse Totals, and Grand Totals of the extended cost values are printed.
Select
Costed physical report from the Physical inventory menu.
The following screen displays:
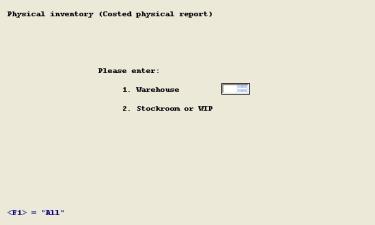
Enter the following fields:
1. Warehouse
Entry Format: Up to 2 alphanumeric characters, or spaces for "Main", or <F1> for "All".
2. Stockroom or WIP
Entry Format: S or W, or <F1> for "All" categories.
Use this program to clear out Count Transactions.
Select
Purge count file from the Physical inventory menu.
A message will remind you to complete all Process Physical Inventory functions before purging this file and asks "Are you sure ?". Answer Y to clear out the file; answer N to escape from this function.
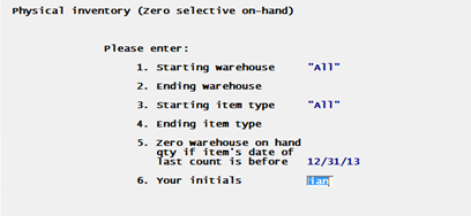
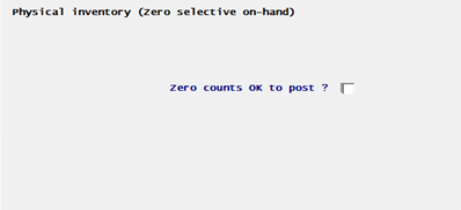
It is a good idea to backup your data files before you run this program. It zeros stockroom On Hand balances for any items that were not posted during the processing of a complete physical inventory, providing that you input a correct cutoff date.
Select
Zero selective on-hand from the Physical inventory menu.
The following screen displays:

Enter the following fields:
1. Starting warehouse
Entry Format: Up to 2 alphanumeric characters, or spaces for "Main", or <F1> for "All".
2. Ending warehouse
Entry Format: Up to 2 alphanumeric characters, or space to default to Starting.
3. Starting item type code
Entry Format: Up to 4 alphanumeric characters or space, or <F1> for "All".
4. Ending item type code
Entry Format: Up to 4 alphanumeric characters, or spaces for Starting.
Zero warehouse on hand
if item's date of last
count is before
Entry Format: 6 numeric digits in MMDDYY format.
Comment: Make sure you enter a date prior to the physical count dates that have been posted to the Item records.
Following a processing delay, the program will automatically print a list of any zero count transactions that it has created according to your entered specifications; at this point these automatically generated transactions are not posted. You may review this list before you respond to the program's next question; "Zero counts OK to post ?" If you answer Y, the zero counts on the list will be posted to the Inventory records. If you answer N, the process will be terminated without posting the zero counts.
This program selects items for cycle counting and prints Cycle Count Worksheets. To make an item eligible for this selection and listing, you must have previously entered a Cycle Count Frequency code of M, Q, S, or A (Monthly, Quarterly, Semiannually, or Annually) in the Item Master record or in related Branch Warehouse Item records. This Cycle Count Frequency and the Date of Last Count in the record are analyzed to determine if the item is due to be cycle counted. Those two fields in the Item Master record control item cycle count selection at its Primary Warehouse, and similar fields in Branch Warehouse Item records control cycle count selection at the branch.
The program selects items due to be cycle counted for the Warehouse you specified and then prints the worksheet. If there are not as many items due to be cycle counted as you requested, a lesser number of items will be listed.
Select
Cycle count worksheet from the Physical inventory menu.
The following screen displays:
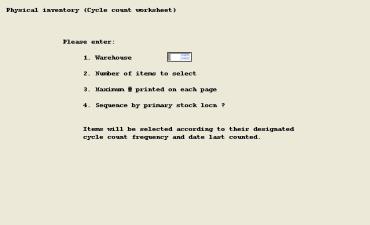
Enter the following fields:
1. Warehouse
Entry Format: Up to 2 alphanumeric characters, or spaces for "Main".
2. Number of items to select
Entry Format: Up to 3 numeric digits, or <F1> for "All required counts".
Comments: You would not normally use the <F1> key default until you have been operating a cycle counting procedure for some period of time. You may then occasionally use this "All required counts" option to determine how well you are keeping up with your intended count frequencies; the total number of items printed on the resultant worksheet list will indicate how current or how far behind schedule you may be in performing cycle counts.
3. Maximum no. printed on each page
Entry Format: Accept the default of 19 items per page, or enter any whole number less than 19 and greater than zero.
Comments: If you normally split the physical counting work among several people and wish to assign less than 19 items per person, use this entry to specify a lesser number of items to be printed on each worksheet page.
4. Sequence by primary stock locn ?
Entry Format: Y or N. Default is Y.
Comments: Y sequences the worksheet list of items by Primary Stockroom Location code in the Item Master or in the Branch Warehouse Item record; N sequences this list by Item Number. Note that Multiple Stock Locations, if used, will not be listed for an item; just the primary stock location for the item and warehouse.